Front:
Back:
And what's even better? It only cost $3 to make!
Cleaning Crew Baby Bodysuit: $3
Plain White Baby Bodysuit: $2 from Walmart (or $1 if your dollar store carries them)
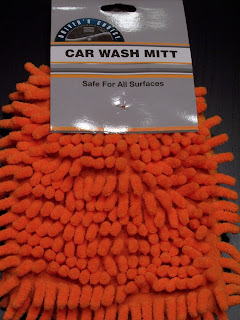
Car Washing Mitt: $1 from Dollar Tree
Freezer Paper for stencil: On Hand
Paint brushes & Fabric paint: On Hand
If you, too, would like to put your small child to work cleaning your hard floors, read the rest to check out the full tutorial.
Cleaning Crew Baby Bodysuit Tutorial
Step 1: Gather Your Supplies
You will need a "onesie" style baby bodysuit of the right size, a car washing mitt, freezer paper, fabric paint and standard painting and sewing supplies like cardboard, paintbushes, thread, a sewing machine, etc. Make sure you wash your body suit before you begin so that it doesn't shrink after you sew and paint it.
Step 2: Make Your Freezer Paper Stencil
If you have never done freezer paper stenciling before, it's super easy. Instead of re-creating a tutorial on how to do that, I'm going to send you over to I Am Momma Hear Me Roar to check out her super fabulous video tutorial on how to do a freezer paper stencil. If you're a newbie, go watch her video right now and then come back.
One thing I do differently than Cheri: I don't trace my design. I just print straight onto the freezer paper. To do this, grab a piece of printer paper and trace it on the freezer paper:
Then cut it out so you have a piece of freezer paper that is the same size as a standard sheet of printer paper. Load it into your printer so that the printer prints onto the non-shiny side of the freezer paper. Then print out the words "Cleaning Crew" in a size that will fit across the back of your body suit (measure your bodysuit to get the right size for you). I love the look of this stencil font that makes it look super industrial. I had to print in blue ink because I was out of black....and really it doesn't matter since you're cutting the letter out with an exacto knife anyway.
Step 3: Paint the Back
Once you've got your stencil made, iron it on the back. I ironed mine on at a bit of an angle to add to the industrial vibe.
(The knife slipped above the N, creating a crack...which I labeled so I'd remember to go easy on that spot)
Paint over your stencil. I'm using Tulip Soft Fabric Paint so that it doesn't get too crunchy and make hard pokey edges. Don't forget to put a piece of cardboard inside the bodysuit while you are painting it so the paint does not bleed through to the other side.
Once your paint is dry, peel off your stencil and admire your work. Don't forget to heat set the paint with an iron and pressing cloth (not pictured)
Step 4: Prepare the Front
Take your standard issue car washing mitt. I got mine from the Dollar Tree:
Remove the front part where the little soft scrubbies are. Mine had selvedge edges on 3 sides and I wanted to leave those intact, so I used a seam ripper to remove the thread along the sides and then I just cut away the wrist band (this was the non-selvedge edge anyway):
Lay out the mitt on your bodysuit so you know where you will be sewing it down. This will help us know where to put the stabilizer:
To stabilize the knit fabric of the body suit while we are sewing, we are going to use another piece of freezer paper. If you have another stabilizing material you would prefer to use, you can use that instead. Slide a piece of freezer paper inside the bodysuit so that it is shiny side up and lines up (with overlap) with the area you would like the mitt sewn to.
(see, freezer paper inserted shiny side up)
Now we'll iron the freezer paper to the inside of the bodysuit. For some reason, the freezer paper does not do so well when you iron directly on the fabric covering the shiny side (ie if you were to just iron the front). SO, you will need to flip the bodysuit over so it is facedown on the ironing board. Use a pressing cloth (mine has zebra stripes) to protect your iron from the painted back side and iron the bodysuit so that the freezer paper adheres to the inside of the front of the bodysuit:
Now we're ready to sew!
Step 5: Sew Mitt to Front
Get your sewing machine ready and loaded with orange (or mitt colored) thread.
Lay the mitt down on your prepared bodysuit, being sure to line the mitt up with the area covered in freezer paper.
Push the little scrubbies on the bottom edge in toward the rest and then flip it down so the scrubbies are touching the bodysuit. Sew along the green dotted line:
Lay the mitt back down on the body suit (scrubby side up). Top stitch around the other 3 edges of the mitt, tucking the edges under as you go. I found it easiest to sew the sides down first (where the selvedge edges were) and then come back to do the top edge:
Once you are done, flip the body suit inside out and it will look like this.
Tear away the freezer paper:
And that's it! Gear up your newly recruited cleaning crew member and let him go to town helping sweep your hard floor surfaces!
I hope you enjoyed my silly spring cleaning project! I'm linking it up to


