Now that my daughter's hair is getting longer, I need to have more hair accessories to keep it all under control. I'm tired of trying to find hair accessories that don't break after one use for a good price. So, I decided that I could probably make something just as cute and for cheap. Why not at least try, right?


 1. Cut one circle and 4 scalloped circles about 2 inches in diameter. They don't have to be perfect. You can make a template or freehand your shape.
2. Add a small amount of glue to the center of the circle.
3. Fold the circle in half & press into the glue so the fold holds.
4. Add another dab of glue to the bottom center of the half-circle.
5. Fold in half again, creating a cone shape. Press into the glue so it holds together.
So, here are 4 tutorials for easy felt hair clips!

What you'll need:
Felt • Glue gun • Scissors • Hair clips or pins

FOLDED FLOWER

2. Add a small amount of glue to the center of the circle.
3. Fold the circle in half & press into the glue so the fold holds.
4. Add another dab of glue to the bottom center of the half-circle.
5. Fold in half again, creating a cone shape. Press into the glue so it holds together.
6. Add glue to the bottom corner of one side of the cone. Place onto the circle with the point in the center.
 This is what the flower will look like with the four flowers placed on the circle. You can leave this as is and fluff the "petals" up, or you can do what I ended up doing by cutting a smaller scalloped circle and placing it in the center to give it some extra fullness. Fluff the circles to get the look you want.
Attach your flower to a clip by adding glue to the bottom of your circle piece and you're done! These also make adorable clothing pins or accent on a bag.

Simple as that!
ROLLED ROSETTE

1. Cut a strip of felt about 1 1/2 inch by 9 inches.
2. Cut a scalloped shape along one half of the entire strip. These don't have to be perfect! (see picture #3) Cut close to the edge, but be careful not to cut all the way through.3. Roll the strip tightly, adding a little glue to the bottom edge while rolling to keep it from slipping & unrolling.
4. Turn your rosette over, fluff out the petals and you're done! The back will be flat, so it's easily attachable to anything.


 1. Cut a strip of felt and scallop the same as the rolled rosette, except cutting closer to the edges.

POM POMS

This method is basically the same as the rolled rosette, except you cut strips into your felt instead of scalloping it.
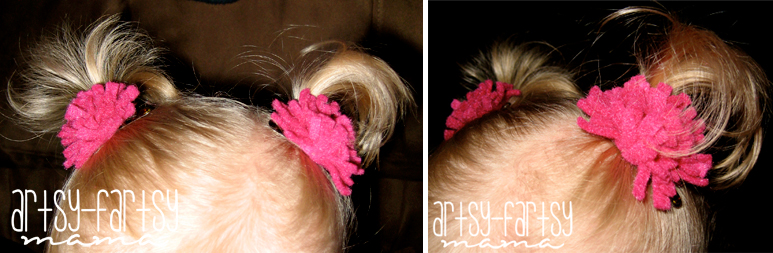
1. Cut a strip of felt about 1 1/2 inch thick by 9 inches. You can adjust this measurement to make your pom poms bigger or smaller. I made these to fit with a 1 year old's piggy tails.
2. Cut strips about 1/8 inch apart along the entire length of felt, being careful not to cut all the way through the edge.
3. Roll the strip tightly, adding a little glue to the bottom edge while rolling to keep it from slipping & unrolling.
2. Cut strips about 1/8 inch apart along the entire length of felt, being careful not to cut all the way through the edge.
3. Roll the strip tightly, adding a little glue to the bottom edge while rolling to keep it from slipping & unrolling.
4. Turn the pom pom over and fluff it out. The back will be flat, so it's easily attachable to anything.

Love those piggy tails!
ROLLED FLOWER WITH PETALS

2. Add a drop of glue at the bottom center of the scallop.
3. Fold scallop in half, holding it tightly for at least 15 seconds so the glue will dry a little. They will pop back open if you don't hold it long enough.
4. Once you've pleated all the petals, start to roll the strip onto itself. Instead of rolling it like the rolled rosette, try to keep this flat, putting the bottom edges together and adding glue more often while rolling to keep it from sliding & unrolling. Adjust the petals while gluing so they look like a flower. That's why you cut a little closer to the edge, it's easier to move & adjust the petals to where they look right.
5. Add some kind of embellishment (I used a floral marble) to the center of the flower.
6. Add a scrap of felt to the center part of the top clip. I left the very top as is (metal), I just didn't want the glue leaking onto the bottom part of the clip and wanted it to sit flat in the hair.
7. Cut a small square or circle and attach it to the back of the flower for stability and to make sure it stayed together.


