 I'm sure most of you have heard there will be a pumpkin shortage this year. It's true! Due to an unusually wet, cool spring and summer seasons, this year's pumpkin crop just isn't what it used to be. I've seen several grocery stores place tags by the pumpkin items, informing customers of the shortage and apologizing for the lack of stock. Those tags themselves, and the price hike associated with them, prompted me to look into just how difficult it is to make my own pumpkin puree.
The truth is, it's not difficult at all! As a matter of fact, it's so easy, I wonder why I haven't been doing it each year! I'm sure everyone has had the same question I did as well- Do you have to make pumpkin puree out of the smaller, more expensive pie pumpkins, or can you simply slice up the ole Jack-O-Lantern and toss it in the oven?
The answer? No and yes!
Most jack-o-lantern pumpkins cost around .07- .20/lb, as opposed to pie pumpkins which are about .25- .38/lb. Each year I have jack-o-lanterns on hand as a result of Halloween decor, yet I'd have to go out and purposefully buy a pie pumpkin.
 To truly experiment with this, I bought 2 pie pumpkins for $1.99 each. I scooped out the yuck {reserving the seeds of course!} and baked them for about 1.5 hours at 350 degrees. Be sure to put about 1 inch of water in the dish and cover the entire contents with foil, to keep the pumpkin moist.
After baking it, I tried a few methods of pureeing the pumpkin, but found each required me to add too much water, so instead, I used a potato masher, which ended up working beautifully.
At the same time, I also swiped a Jack-o-Lantern from our front porch {that had only been carved the day before} and went through the same process.
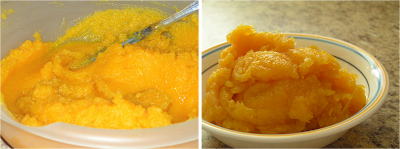 The end result was two large bowls of beautiful pumpkin puree. {Left side is the pie pumpkins, right is jack-o-lantern pumpkin!} As you can tell, they were about the same in color. There were a few differences in the puree. Mainly:
- The pie pumpkins had a finer consistency as the end result.
- The jack-o-lantern had a much higher water content than the pie pumpkins. My bowl of puree was literally swimming, so I ended up straining it for about 2 hours.
- The pie pumpkin was slightly sweeter, but not nearly as much as I'd expected.
The final verdict? It's not enough of a difference to validate the extra cost associated with pie pumpkins! I'll be baking up my jack-o-lanterns from here on out! I alternated cooking with the pie pumpkin puree and the jack-o-lantern puree and even despite the differences, we couldn't tell them apart once baked.
Now for the cost factor. Here's the breakdown:
Pumpkin from a can results in 3.5 cups per 29 oz can. A good price right now is about $2.09, resulting in a .60/cup priceHere are a few recipes I've made this week that were too good to not pass on! The muffins are really good, but you have to try the cookies! They're absolutely incredible!
Pie pumpkins were $1.99 each and yielded 9 cups of pumpkin, resulting in a .44/cup price
Jack-O-Lantern pumpkins cost less than half the amount of pie pumpkins, resulting
in an .18/cup or less price! I didn't even bake all the pumpkin from the jack-o-lantern simply because it would have resulted in way too much!

Roasted Pumpkin Seeds
Has nothing to do with pumpkin puree! They're so good, you have to try them!
Melt 1-2 TBSP of butter and mix into about 2 cups of well cleaned pumpkin seeds. Spread on a baking sheet and sprinkle with kosher salt. Bake at 350 degrees for about 45 minutes.
 Apple Pumpkin Muffins
I saw this recipe and knew I had to try it, being as I have quite a bit of diced apples in my freezer. My family loved these so much, I've made this recipe twice in 3 days! The original recipe is here, however, I changed so much of it, it's almost unrecognizable. Here's my version:
- 1 1/4 cups whole wheat flour
- 1/2 cup brown sugar
- 1 egg
- 1 tsp cinnamon
- 1/8 teaspoon nutmeg
- 1 1/4 tsp baking soda
- 1/2 tsp salt
- 3/4 cup pumpkin puree
- 1/4 cup canola oil
- 1/2 cup milk
- 1 cup diced apples, softened in microwave {2 minutes worked for me}
Cool and enjoy!
 Soft Ginger-Pumpkin Cookies with Browned Butter Frosting
This recipe came from the newest Pillsbury recipe booklet, available in stores. I received it for free from MyBlogSpark for providing input for the cover photo. I made some changes to this one as well, just because it called for items I don't normally have on hand, like crystallized ginger. It still turned out incredible though, so be sure to try it!!
- 1 cup packed brown sugar
- 3/4 cup butter (I used butter flavored Crisco!}
- 3/4 cup pumpkin puree
- 1 egg
- 2 1/2 cups flour
- 1 tsp baking soda
- 1 tsp ground ginger {I used 1/2 tsp fresh grated ginger I had left over from another recipe and the other half ground ginger.}
- 1/4 cup chopped crystallized ginger {I omitted this and my cookies still had plenty of ginger flavor!}
- 1 tsp cinnamon {my addition}
- 1/2 tsp vanilla {my addition}
- 1/3 cup butter {do not use margarine!}
- 2 cups powdered sugar
- 1 tsp vanilla
- 2-4 TBSP milk
In a small saucepan, heat the 1/3 cup butter over medium heat, stirring constantly. Cook until butter turns a nice golden brown. It took mine about 5 minutes and when it turned, it turned very suddenly. Remove from heat. Add in remaining ingredients, stirring until frosting is smooth and spreadable. Let cookies cool for about 20 minutes before frosting. Enjoy!


